Home
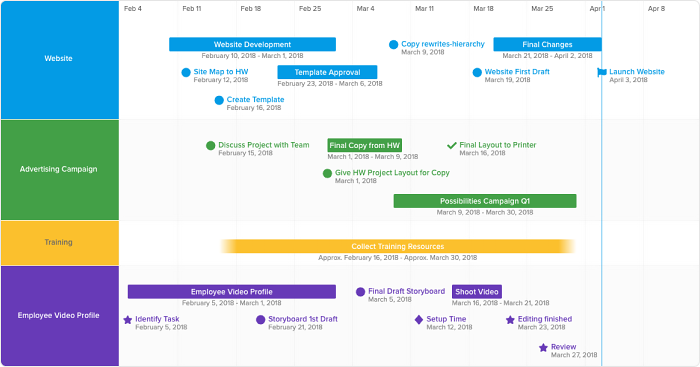
/ How To Draw A Timeline In Word : In the all charts window that pops up, select the bar category and choose stacked bar as the type of graphic to use for your gantt chart.
How To Draw A Timeline In Word : In the all charts window that pops up, select the bar category and choose stacked bar as the type of graphic to use for your gantt chart.
How To Draw A Timeline In Word : In the all charts window that pops up, select the bar category and choose stacked bar as the type of graphic to use for your gantt chart.. Gantt charts are a useful way to visualize data. If this is your first attempt at creating a timeline in word, select basic timeline. On the view tab, select the ruler and gridlines check boxes to help you lay out elements.; Create a basic timeline open a new word document and change the page orientation from portrait to landscape, which will make room for more items to be placed on the timeline. With the new blank slide selected, click smart art, and choose a timeline style from the process menu.
Add a blank slide and insert a smart art timeline now go to the insert tab, and add a new blank slide. However, if you are an expert in designing diagrams, your creativity may be restricted by templates. Click the insert tab and select shapes again. This forms the timeline's backbone. You start by drawing the vertical line.
How To Make A Timeline In Microsoft Word Free Template from img.officetimeline.com Click here to download this template. Instead, you'll have to add a gantt chart to word manually. If you want to add more events, simply press enter at the end of the last event. Click the insert tab and select shapes again. Create a timeline in word 2003 1. To do so, go to the layout tab on the word ribbon and click on orientation. Hold the shift key to keep the line straight. Click process in the smartart graphics gallery.
A new event will be created and the timeline will automatically update.
Instead, you'll have to add a gantt chart to word manually. Select the 'landscape' orientation option and click 'ok.' 2. Go to the 'file' menu, click on 'page setup' and go to the 'margins' tab. To do so, go to the layout tab on the word ribbon and click on orientation. However, there are a few timeline templates available in word. You start by drawing the vertical line. When creating timelines for word, consider ones that get the most of portrait orientation. Click the insert tab and select shapes again. Über 7 millionen englischsprachige bücher. A microsoft timeline template can help. Powerpoint makes it much easier to edit visual elements (like the individual chevrons) than if you were working on a word document, but the best way to give more detail to your timeline is to create separate slides to break down each month of your timeline further. Create a basic timeline open a new word document and change the page orientation from portrait to landscape, which will make room for more items to be placed on the timeline. Word 2016, 2013 & 2010 have a feature that helps users to create timeline in a word document.listed below the steps that can be followed for creating a timeline.
You should place it either at the center or the left side and make the adjustments so it runs the length of the whole page. To add events and dates to the timeline, select any of the callout shapes, which you can connect. Choose smartart from inside the illustrations box. Go to insert tab, click smart art in the group illustrations. However, if you are an expert in designing diagrams, your creativity may be restricted by templates.
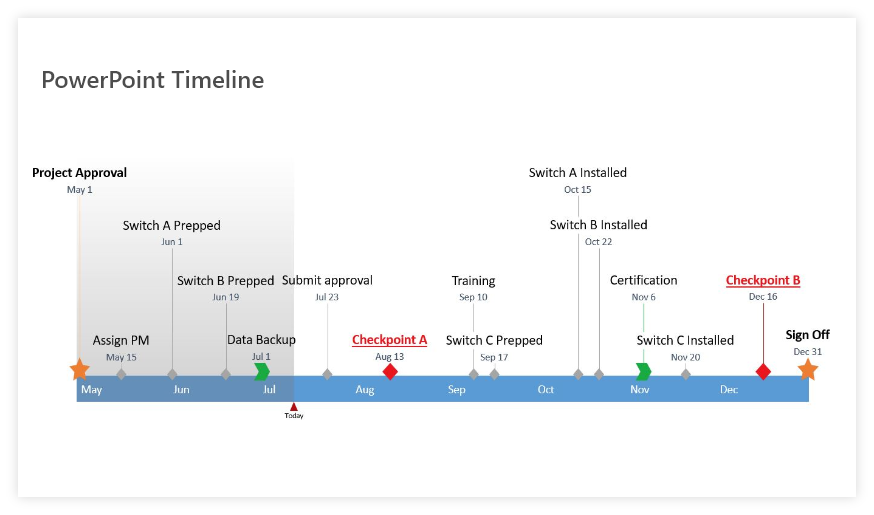
10 Free And Paid Interactive Timeline Makers 2021 from www.ispringsolutions.com Choose smartart from inside the illustrations box. Click text in the text pane, and then type your text. In essence, they can be used as a comprehensive timeline for project management. This forms the timeline's backbone. Keeping space between each event, add them to the timeline. Style your timeline and add images. Watch the following video to learn to quickly create and customize a timeline effortlessly. Powerpoint makes it much easier to edit visual elements (like the individual chevrons) than if you were working on a word document, but the best way to give more detail to your timeline is to create separate slides to break down each month of your timeline further.
Create a timeline in word 2003 1.
Choose smartart from inside the illustrations box. To do so, go to the layout tab on the word ribbon and click on orientation. Go to the 'file' menu, click on 'page setup' and go to the 'margins' tab. Click the insert tab and select shapes again. Select any design you like—it can always be changed easily later. Create a basic timeline open a new word document and change the page orientation from portrait to landscape, which will make room for more items to be placed on the timeline. Then select the 'process' optio. If this is your first attempt at creating a timeline in word, select basic timeline. To enter your text, do one of the following: On the page layout tab, click orientation, and then click landscape.this gives you a large horizontal workspace. Select insert from the top menu. Click here to download this template. Watch the following video to learn to quickly create and customize a timeline effortlessly.
A new event will be created and the timeline will automatically update. Select the arrow and draw it from the last part of the top section of your timeline to the first part of the second section of your timeline. Über 7 millionen englischsprachige bücher. Select the 'landscape' orientation option and click 'ok.' 2. Navigate to insert menu, click the smartart option under illustrations section
How To Make A Timeline In Microsoft Word Free Template from img.officetimeline.com Keeping space between each event, add them to the timeline. Hold the shift key to keep the line straight. To do so, go to the layout tab on the word ribbon and click on orientation. Select text and enter your first event. On the view tab, select the ruler and gridlines check boxes to help you lay out elements.; In the all charts window that pops up, select the bar category and choose stacked bar as the type of graphic to use for your gantt chart. To make your word timeline, first change your document's orientation from portrait to landscape. Create a basic timeline open a new word document and change the page orientation from portrait to landscape, which will make room for more items to be placed on the timeline.
Watch the following video to learn to quickly create and customize a timeline effortlessly.
In essence, they can be used as a comprehensive timeline for project management. This forms the timeline's backbone. On the view tab, select the ruler and gridlines check boxes to help you lay out elements.; When you add descriptions under the events, remember to keep them brief. Create a timeline in word 2003 1. Select text and enter your first event. Go to the 'file' menu, click on 'page setup' and go to the 'margins' tab. A vertical timeline is a timeline mainly composed of dates and corresponding information of events. On the page layout tab, click orientation, and then click landscape.this gives you a large horizontal workspace. Click the straight line under lines. But they can take time to create. Word 2016, 2013 & 2010 have a feature that helps users to create timeline in a word document.listed below the steps that can be followed for creating a timeline. Open the word document on which you want to create a timeline.
To create this base, click on the insert tab how to draw a timeline. This forms the timeline's backbone.